80% question

Welcome to ArizonaShooting.org!

Join today!

ReaperOfMars

Member
Joined
Dec 21, 2020
Messages
38
Location
MesaTown
This is the first 80% I’ve done. Used a drill press. How perfect does it need to be. I’ve attached pictures. The depth is 1.23-1.24.

The sidewalls are a little crappier than I would like. Trying to determine how much more I need to go at it.

Thanks!
Rob
 

Attachments

  • D11BAEB9-EB30-4715-B4EB-FCAC1FF0FFB3.jpeg
    D11BAEB9-EB30-4715-B4EB-FCAC1FF0FFB3.jpeg
    97.3 KB · Views: 4,301
  • FAA6DE63-C850-47F5-92A0-80EF9D3BFE94.jpeg
    FAA6DE63-C850-47F5-92A0-80EF9D3BFE94.jpeg
    92.4 KB · Views: 4,301
  • A3537BDA-EAFB-4D2B-BCCD-A0C2A0EC78F9.jpeg
    A3537BDA-EAFB-4D2B-BCCD-A0C2A0EC78F9.jpeg
    89.8 KB · Views: 4,301
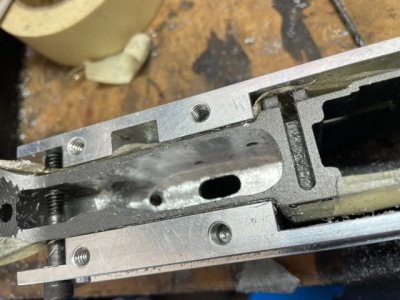
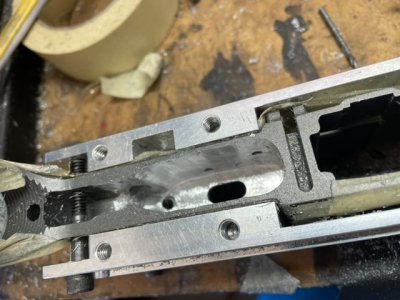
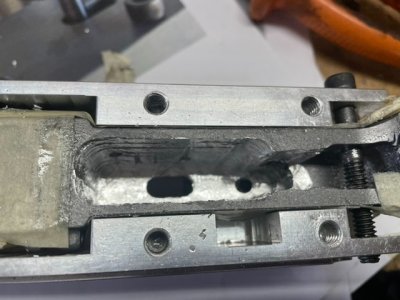
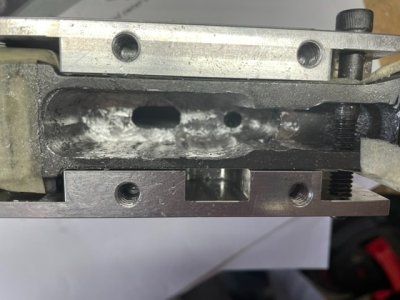
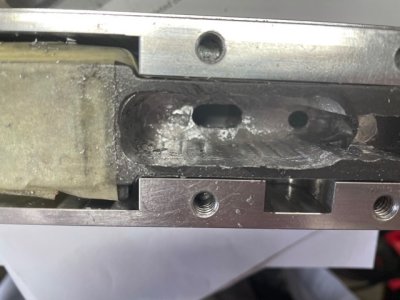
The 5D Tactical jig IS ABSOLUTELY THE BEST 80% JIG out there. I got it to the point where I could crank out a perfect lower in about 15 minutes. If you follow the instructions, go slow, vacuum the cuttings as you go, and follow these recommendations (below) you can start with perfect lowers right out of the gate.

Recommendations.

1. Use a vacuum to clear the cuttings as you go

2. Make the cuts slightly smaller (shallower) than the instructions recommend - easy to do and the added cuts don't add that much to the process, and

3. MOST IMPORTANTLY - ALWAYS let the router motor come to a complete stop before you remove the router/mill from the receiver. NEVER start the router until the router and mill bit is situated properly on the guide plate.

I've done many of these and I am still working with the same pristine 5D Tactical router bit that I started off with. You can cut a lot of aluminum with a carbide mill bit if you are careful
 
@xj using mil spec traditional for now. Dude that’s a beautifully machined lower.

@dilly I’m seeing the error of my ways. The jig I’ve got is nice but it’s time consuming. 15 minutes...I’m on 3 days now. 😞

After walking away from it for a while yesterday I realized I’m and idiot and it’s a whole lot closer (and cleaner). A little bit more work on it and it will be good to go. It’s not quiet as pretty as xj’s example but it doesn’t look like a stumbling drunk weaving all over anymore. I’ll post a picture when it’s done.

Appreciate the advice guys.
 
I finally got the sides machined out enough and the floor machined down to a proper depth.

Took a little bit of dremel work to get it all working smooth. Assembled and disassembled the trigger and hammer about 4 times to get it all functioning flawlessly.

Everything seems to work as it should.

I’m pretty excited to try it out...when I find ammo.

Thanks!
-R
 

Attachments

  • C6080EEF-CBB6-4EC4-A24A-E658CBDDB9AB.jpeg
    C6080EEF-CBB6-4EC4-A24A-E658CBDDB9AB.jpeg
    102.8 KB · Views: 4,248
  • F40C6710-5D10-43DB-8B14-23AD3C47DA9B.jpeg
    F40C6710-5D10-43DB-8B14-23AD3C47DA9B.jpeg
    105 KB · Views: 4,248
  • DBF66F6C-8582-40F7-9A8F-9945F56F2871.jpeg
    DBF66F6C-8582-40F7-9A8F-9945F56F2871.jpeg
    102.3 KB · Views: 4,248
Back
Top