Reassembly Help... Need Tip / Trick - or a Swift Kick in the Pants

Welcome to ArizonaShooting.org!

Join today!

BigNate

Member
Joined
Jul 5, 2020
Messages
799
Location
Phoenix
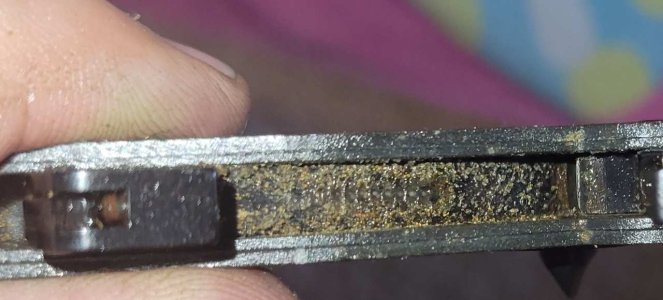
I recently acquired an Anschutz 525 semi-auto 22. When I got it home I wiped it down and confirmed that things cycled reasonably by hand, threw a brush and patch down the bore, and took it out to let it do it's thing (which it did just fine). I got it home and thought that I should tear it down and clean it out. Well - I'm both glad I did - and I'm kicking myself. In short - it was FILTHY inside - full of sand and grit - like this from under the hammer spring in the fire control group:
20230430_163925 - Copy.jpg
Thankfully the bore looks to be in good shape. I suspect that in the past, "cleaning" meant a patch down the bore and not much else.


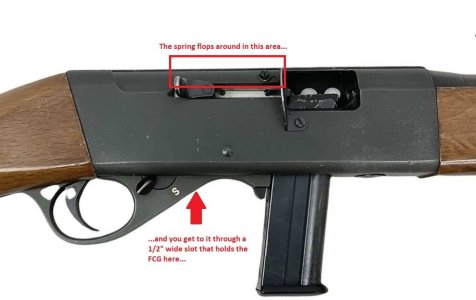
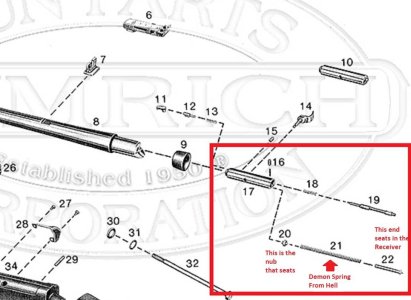
Anyway - I got things pretty well cleaned out and now I'm having an issue putting the thing back together. In short - the spring that drives the bolt back forward is a very long, floppy, spring. It has a little nub insert on the end that seats in the back of the bolt - and a pin about 1" long that goes in the other end of the spring and seats in the back of the receiver.
Anschutz_525_schem Reduced.jpg

The openings in the receiver are too small for me to get my fingers in there to hold the spring flat while I compress it by pushing the bolt back towards the back of the receiver. I've found exactly one youtube video on this family of guns and when they come to this part of the reassembly the guy says something like: "this is tricky - but you'll figure it out..." Apparently he's an optimist - because I spent a good hour fighting with this thing and other than some raw finger tips I got 'nothin... I've tried a variety of different implements to pin the middle of the spring to the top of the receiver while sliding the bolt back in on its rails but before I get the bolt back to the point where the spring would be compressed onto the pin - I have to pull my tool out and the spring goes haywire.

Pointers? Thoughts? Links to videos that deal with a similar situation on different guns that might give me some divine inspiration? I'm going to try some other stuff tonight - but I'd really appreciate any pointers.
 
Found this. See if it helps. He seems to start with the spring inserted into the bolt then seating it with a tool.

https://youtu.be/VS2oSmDGRzY?t=301
 
Doc said:
Sausage fingers?

Yes - absolutely... that - and the fact that the receiver is built with a way that is narrow with minimal openings. :-)
Receiver3.jpg


YNOTAZ said:
Found this. See if it helps. He seems to start with the spring inserted into the bolt then seating it with a tool.

https://youtu.be/VS2oSmDGRzY?t=301

Thanks sir - that's the "one video" that I found. the thing that I'm struggling with is what he describes from about 5:30 to ... A few times he says stuff like - "you just have to figure it out" ... "its a pain in the ass... to reassemble, now it gets a bit dicey... this is going to be a bit 'fritzy' - I hate doing this... this is the only thing that actually kind of ticks me off on this rifle - that Anschutz didn't really think what they did here... but as mentioned... figure it out for yourself..." :-)


xerts1191 said:
Did you figure something out Nate?

Not yet - but tonight I'm going to build a tool... I'm going to bend a little chunk of sheet metal to about 90 degrees and weld a handle on... then use this to keep downward pressure on the length of the spring while I start seating the bolt. I'm guessing the trick will be making it long enough that it holds enough of the length of spring - while still letting the bolt get far enough into the receiver to capture the bulk of the spring. I'm thinking I'll make it about 150% the length of the pin.

If this doesn't work I'll just keep fiddling with it in the evenings until I either have no skin left on my finger tips or I get it done...

EDIT... I just remembered... my daughter came home from college Sunday... she has small fingers... I'm guessing I can recruit her to stick her fingers down in there and flatten the spring while I seat the bolt...
 
baja said:
Have you tried duct tape?

:icon-lol:

I actually removed a bunch of duct tape from the stock... :-) For whatever reason, the previous owner had added a limb-saver and had wrapped the back of the wood stock in duct tape to build it up so the rubber sleeve would stay. :-)
 
With all the dirt and now duct tape, previous owner sounds 'interesting'.
Glad you rescued it.
 
He was actually an incredible guy - but his mind was gone. Korean War Marine - Purple Heart and Bronze Star X2. I suspect that the condition of this gun was a function of his mental decay. I wish I had known him when his mind was still there (he is a friend of my parents).
 
Does the bolt have a hole through it. One of my firearms has a rod that goes through the bolt, through a long recoil spring. The rod stops the spring from going wonky when pushing bolt back in, similar to your issue.
 
YNOTAZ said:
Does the bolt have a hole through it. One of my firearms has a rod that goes through the bolt, through a long recoil spring. The rod stops the spring from going wonky when pushing bolt back in, similar to your issue.

I'll look again when I get home but I don't think so... The hole where the spring seats is just deeper than the spring pin. It does not go all the way through. The uncompressed spring is about 4" long. The "rod" that seats at the back of the block is about 1"long and the "nub" that seats in the bolt end of the spring is maybe 1/8" thick. I can compress the spring onto the rod and into the bolt when it is all outside of the receiver - but I have to let it decompress to start the process of putting the bolt back into the receiver. I had my daughter try her fingers through the bottom of the receiver and it was a no-go... the openings are still too small.

So - I was going back to my idea for building a tool - and as I think about it - I think I might try a simple "L" made of 1/4" solid round stock maybe a 6" handle with a 1" leg at the end and a 90 degree bend in it... and a little dimple in the end of the leg. Compress the spring and pin into the bolt... insert the tool into the receiver with the leg coming out the end where the bolt enters... capture the pin with the dimple in the end of the leg and then push the whole thing back into the receiver. when the tool bottoms out against the back of the receiver, rotate it out of the way and then fiddle the pin into its recess in the back of the receiver. That will be tonight's project.
 
BigNate said:
He was actually an incredible guy - but his mind was gone. Korean War Marine - Purple Heart and Bronze Star X2. I suspect that the condition of this gun was a function of his mental decay. I wish I had known him when his mind was still there (he is a friend of my parents).

I had no idea, Sorry to hear that.
 
delta6 said:
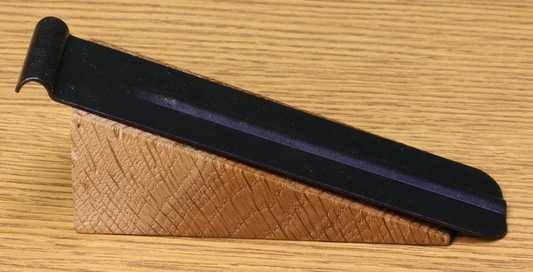
Nathan..good luck. Sounds like a well thought out plan and tool. Needs to look like this???525 Bolt Return Spring Assembly tool-1.jpg

Yup... that's about what I was thinking of - except made to come in from the bottom (bend the handle about 90 degrees up so that it presses down on the "cup."
 
baja said:
BigNate said:
He was actually an incredible guy - but his mind was gone. Korean War Marine - Purple Heart and Bronze Star X2. I suspect that the condition of this gun was a function of his mental decay. I wish I had known him when his mind was still there (he is a friend of my parents).

I had no idea, Sorry to hear that.

No worries man... you couldn't have known - and if I'd gotten them from someone else and found what I found, I'd have had the exact same thought.
 
OK - I got it back together last night. It took a bunch more attempts and two sets of hands - and my soft keyboard-warrior fingers are raw this morning as I type this... but it is back together. :-)

The fix went like this:
1) Make a tool that goes into the receiver from the bottom with a leg that fills the space in the receiver where the bolt gets inserted (pics below).
2) Compress the spring and the spring guide pin into the bolt
3) Push the back end of the bolt with the compressed spring into the receiver releasing the end of the pin into the tool to keep the spring and pin in the bolt.
4) Push the whole mess back into the back of the receiver - maintaining pressure on the bolt and tool to keep the pin in the bolt.
5) Hold the bolt in the back of the receiver with a drift and rotate the tool out - letting the pin come out of the bolt and seat in the recess at the back of the receiver. It took a few tries to figure out how to do this slowly enough and with the right pressure on the bolt so that the spring didn't "pop".
6) Continue to hold the bolt back at the back of the receiver while putting the charging handle into the bolt and then screwing deflector (which serves, with the charging handle, to keep the bolt from coming too far forward when the barrel is installed) back to the receiver with two tiny screws.

Once this was done - the rest of the assembly could continue.

I'll say this - I can't see how this could be done by a single set of hands without some very specialized tooling. I agree with the guy in the video - I have no idea how zee-Germans that engineered missed that this assembly is / was a colossal mess for the typical gun owner. Unless the intent of the manufacturer is that the gun owner should never pull the bolt and clean it - this is a really bad design.

So - the tool...

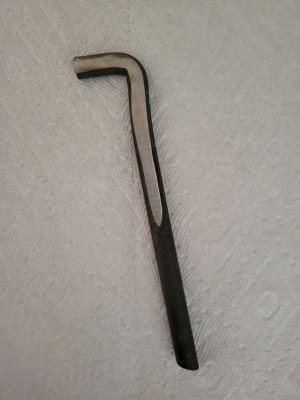
The tool... took a piece of 1/2" round stock, bent it 90 degrees (ok - bent it about 95 degrees and had to bend it back) - then drilled the end of the short leg to cant the surface to the inside so that the pin would not slide out/off. Ground the sides down such that it was narrow enough to fit into the receiver through the opening where the fire control group / trigger assembly seats...
Tool.jpg


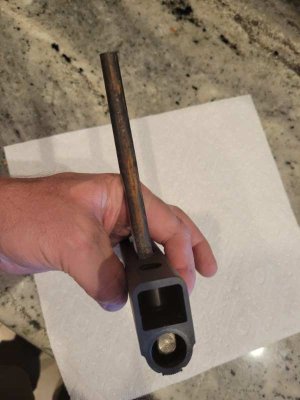
The tool in the receiver waiting for the bolt / spring / pin assembly...
ToolInReceiver.jpg
 
Back
Top